IMPORTANT UPDATE -> 360 VR Panorama Workflow
You may have already read my post on how to build your own pano-head, but this time I will show you a completely new way to do so. The pano-head built in the link above was great, but I wanted something better, in particular I wanted something much faster to use!
The name
The name BoneHead comes from all my friend that seeing it for the firs time used to ask: “What the hell is that? A Bone?”, and I: “..no, it’s a pano Head!”
Why a BoneHead
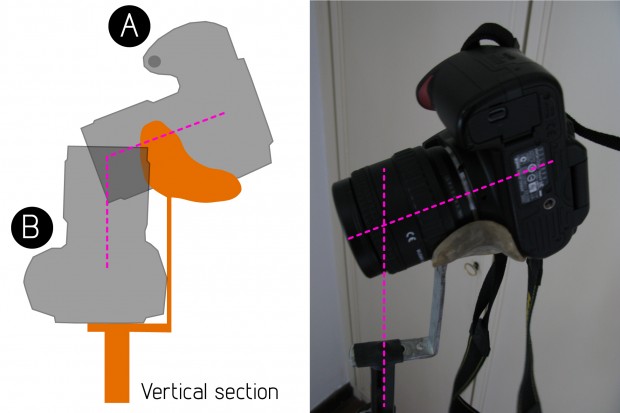
With the old classic head you have to screw your camera every time, and to pick the right angle.. I wanted something pre-configured for my camera+lens combination to speed up all the setting up process. Now all I have to do is to lay down the camera inside the head and to shoot. A BoneHead will probably only fit one camera+lens combination, since it is made literally on it! Just so you know, my gears are a Nikon D5000 and a Tokina 10-17; now to take a full 360 panorama I basically only need 7-8 shots:
- 6 shots in circular, keeping the camera in vertical position and tilted ~ -15° from the horizon
- 1 zenith shot, leaning the camera on the braket
- 1 optional nadir shot hand-holding the camera (to take the ground below the tripod) So before starting to build your own BoneHead, make sure on how you are going to use it!
How to build a BoneHead
I’m sorry but I’m not able to provide detailed instructions and images on how I built the BoneHead, but it could be pretty straightforward if you are good at handcrafting stuff. What you’ll need (at least what I used):
- a metallic tube that fits into your tripod’s tube
- an L bracket
- fibreglass
- various screws and tools I simply used the tube and the L bracket from my former pano-head, I just bended it accordingly and put some rubber on the screw coming out from the tube, but I promised myself I’ll find a better solution! Then it comes the more complex part: find the nodal point of your lens.
Since my BoneHead is being use at the same time for the 6 horizontal shots and the zenith one, I hade to make sure that the nodal point did coincide in both configurations!
This was a bit of a pain in the ass because you have to be very precise. Moreover if dealing with metal and fiberglass…
After all these calibrations, you have to cover your camera with appropriate plastic layers to protect it (N.B. fiberglass in its melt phase can severe damage your camera and lenses, please be very careful!). Then you need to melt the fiberglass (I don’t know how to describe this process in English, but you’ll find out easily on the web) and to wrap it around the camera and the L bracket, leaving space for the camera it to be removed. When the fiberglass begins to get solid you can remove your camera, and finally you can polish your brand new BoneHead!
How to use a BoneHead
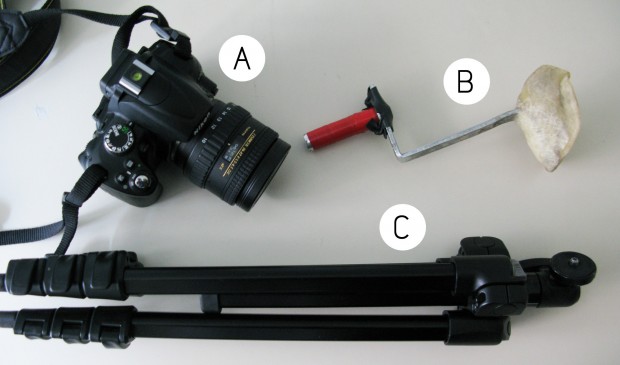
The following picture shows my set up:
- A - the camera
- B - my BoneHead
- C - the tripod (a Manfrotto 7322yb) I simply turn upside down the tripod vertical tube and insert my Bonehead in it, then the camera is attached to it. After taking an horizontal shot I rotate the head of about 60°, after the 6 shots I put the camera in zenith position and take the last one. If the ground has a particular texture I also take a nadir shot hand-holding the camera, this one will be manually processed in Photoshop (and not with the auto-stitch software).
Gallery
You will probably get more from the pics and videos below than from all that bunch of text above!
httpv://www.youtube.com/watch?v=OZgB8-CNaRk


